• Skip to primary navigation
  • Skip to main content
  • Skip to primary sidebar
  • Recipes
  • Travel
  • About
  • Shop
  • Contact
cook with dana

Cook With Dana

Shrimp Siu Mai

October 13, 2021

Jump to Recipe Jump to Video Print Recipe

siu mai shrimp

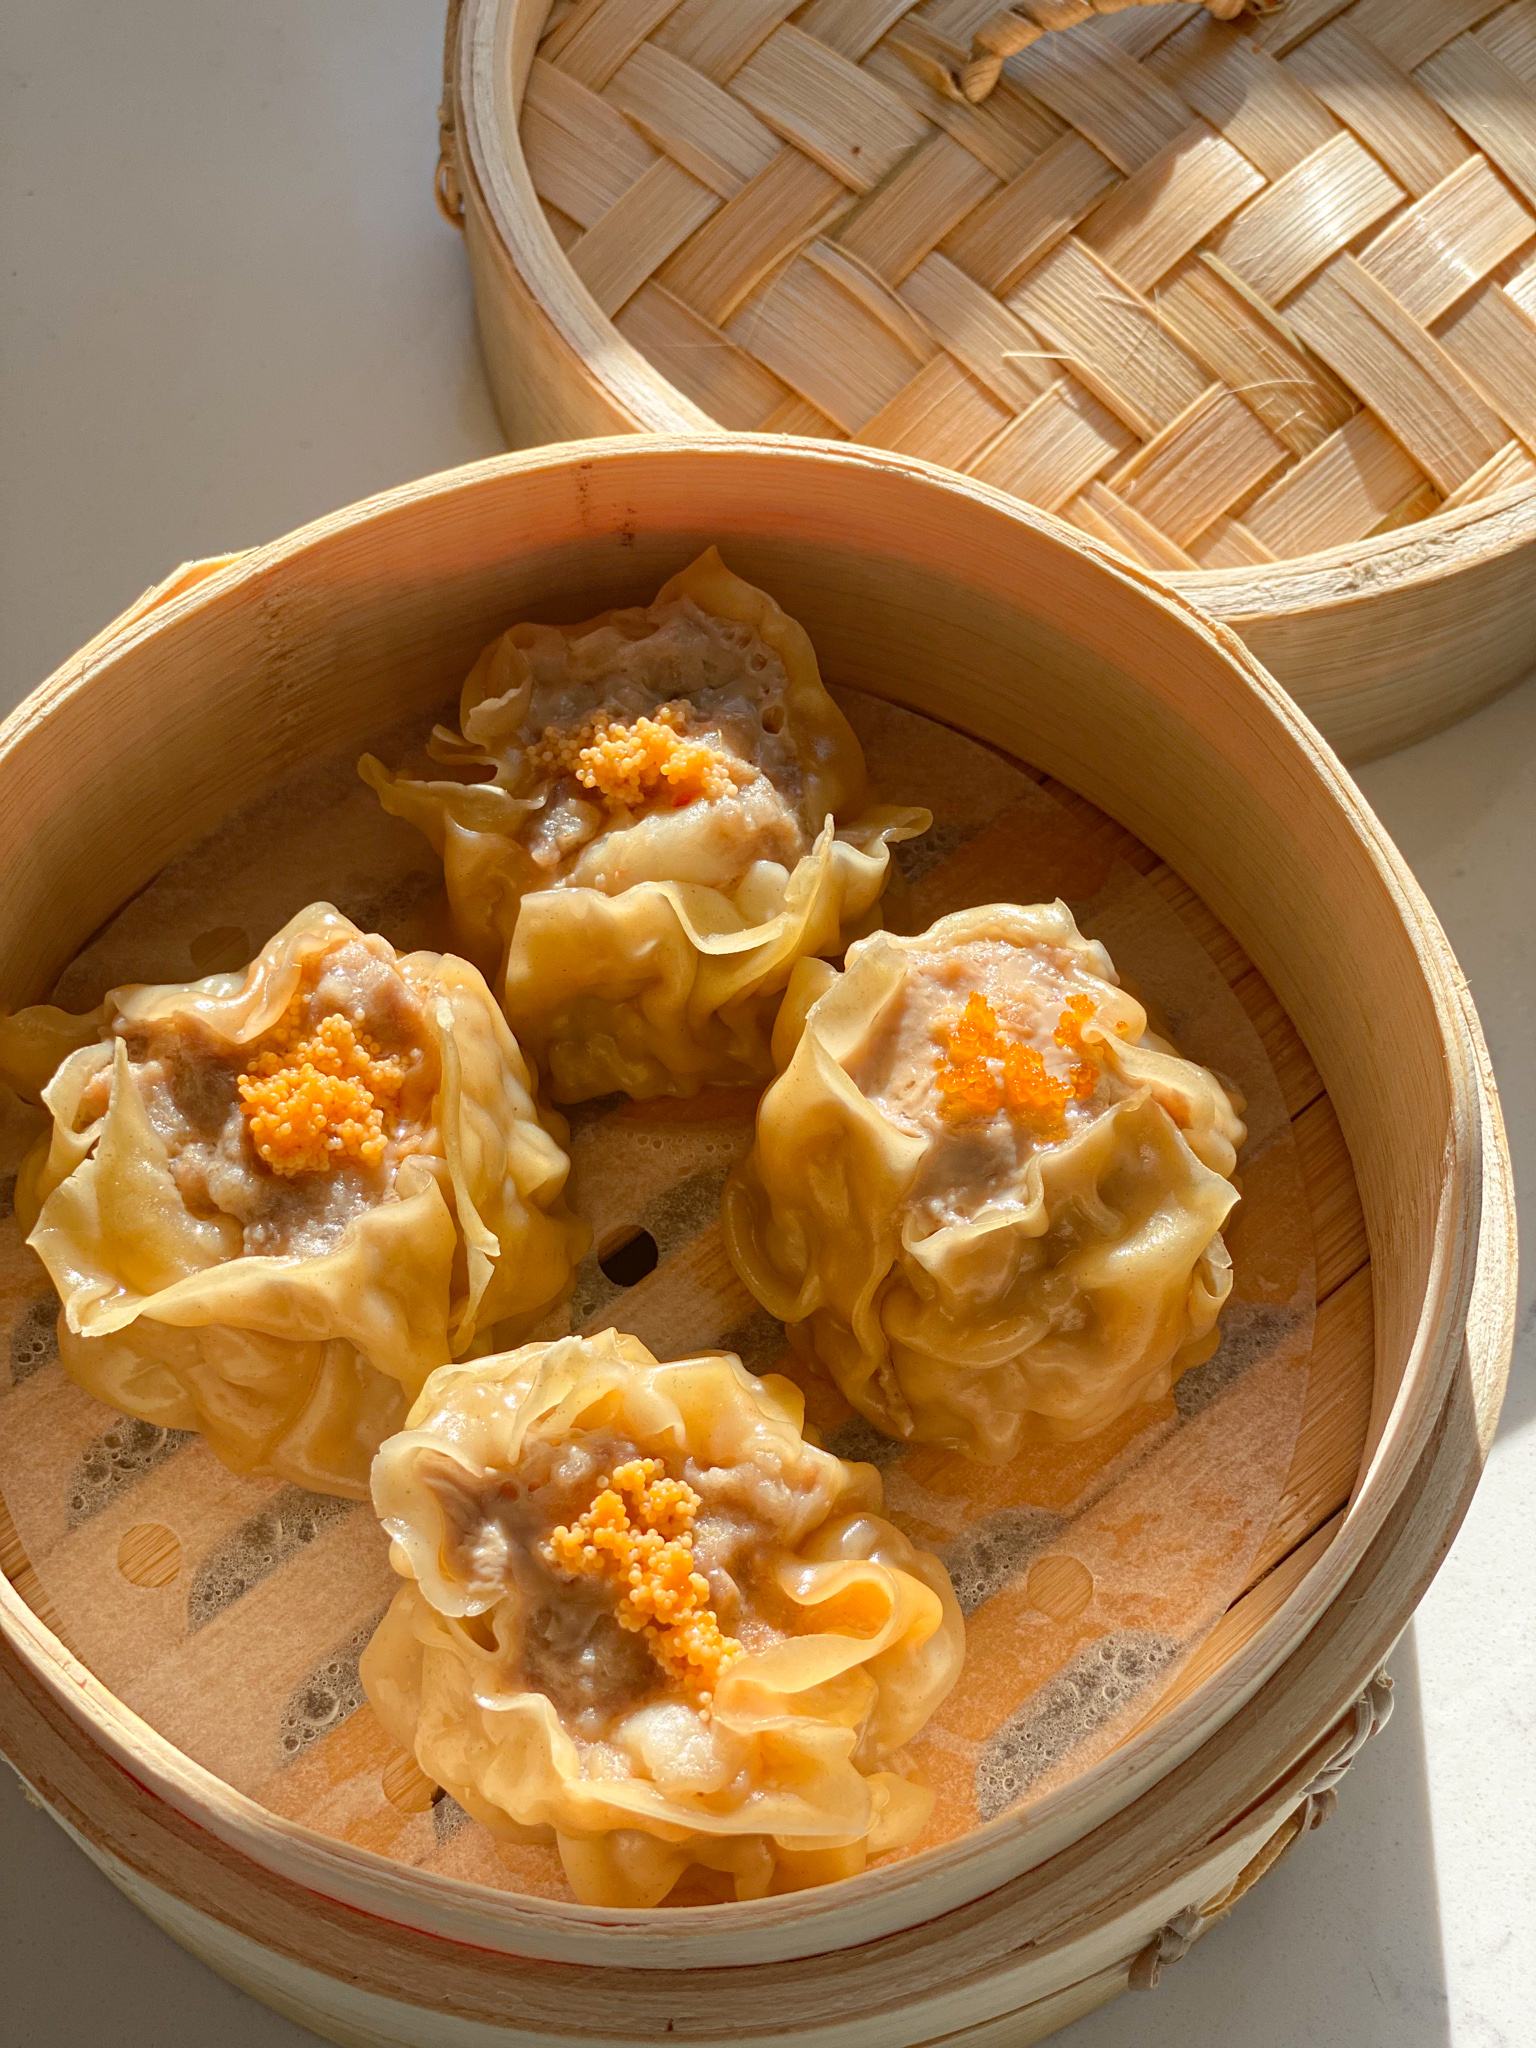
Sui mai (燒賣) is a classic OG dim sum dish. If you have never tried this juicy dumpling before, it is filled with pork and shrimp. My Cantonese dad taught me how to make this recipe and I think its even better than the ones you get at dim sum. The first time you make this might be a little tough, so make sure you watch the video before. This recipe makes around 50-60 sui mai. Since its such a large serving size, I recommend to freeze the rest if you are not eating them right away. It should last 1 month in the freezer ◡̈

siu mai chinese dim sum

Ingredients you need for your shrimp siu mai:

  • 2 lbs ground pork
  • 1 1/2 tbs ginger
  • 2 eggs
  • 2 tbs soy sauce
  • 2 tsp salt
  • 1 tbs oyster sauce
  • 2 tbs neutral oil (vegetable oil)
  • 2 tbs corn starch
  • 2 tsp chicken bouillon
  • 1/4 cup water
  • 1/2 tbs sesame oil
  • 1/2 lb shrimp (cut in small pieces if you have large shrimp)
  • 2 tbs extra pork belly fat (optional), minced
  • 1-2 packets of wonton wrappers (make sure they are thin)

Steps to make the shrimp siu mai:

  • Step 1. To make the pork filling, mix together 2 pounds ground pork, 1.5 tablespoons of ginger, 2 eggs, 2 tablespoons soy sauce, 2 teaspoons salt, 1 tablespoon oyster sauce, 2 tablespoons oil, 2 tablespoons corn starch, and 2 teaspoons chicken bouillon. Mix in clockwise direction only to help with myosin development. This helps keep the pork tender (says my dad).
  • Step 2. After pork mixture is stirred well, add 1/2 pound shrimp. If you have large shrimp, cut in small pieces.
  • Step 3. If you have pork belly on hand, mince the fat and add 2 tablespoons of it into the pork filling mixture. This makes the pork super juicy! This is optional though because I understand that not everyone has pork belly fat on hand.
  • Step 4. Then, add 1/4 cup water and 1/2 tablespoon sesame oil and make sure the pork mixture is mixed well.
  • Step 5. Next, you want to get your wonton wrappers ready. Most of them come in a square shape so you should cut them in circle. If you can find wonton wrappers that are already in circle shape, then you can skip this step. An easy trick is to cut one wonton wrapper in a good circle and lay it on top of a stack of wonton wrappers to get all of them an even size.
  • Step 6. To wrap the wonton wrappers, you need a little bit of water in a bowl. Paint the edge of the wonton wrapper with the water. This helps the wrapper stick together.
  • Step 7. Add 1 tbs (and a little more, depending on size of the wonton wrapper) of the pork filling in the center and scrunch the edges.
  • Place the siu mai on a flat surface and make it stand tall. (reference the video)
  • After wrapping all the siu mai, you can steam them! I steamed around 10 siu mai in med-high heat for 12-15 minutes and they’re ready to eat!
chinese siu mai
Print Recipe Pin Recipe

Shrimp Siu Mai

Cantonese style siu mai is filled with minced pork and shrimp
Prep Time1 hr
Cook Time30 mins
Course: Appetizer, Main Course
Keyword: dim sum, siu mai

Ingredients

  • 2 pounds ground pork
  • 1½ tablespoons ginger
  • 2 eggs
  • 2 tablespoons soy sauce
  • 2 teaspoon salt
  • 1 tablespoon oyster sauce
  • 2 tablespoons neutral oil vegetable or canola oil
  • 2 tablespoons corn starch
  • 2 teaspoon chicken bouillon
  • ¼ cup water
  • ½ tablespoon sesame oil
  • ½ pound shrimp cut & de-veined, cut in small pieces
  • 2 tbs pork belly fat, minced optional
  • 1-2 packets wonton wrappers

Instructions

  • To make the pork filling, mix together ground pork, ginger, eggs, soy sauce, salt, oyster sauce, oil, corn starch, and chicken bouillon. Mix in clockwise direction only.
  • After pork mixture is stirred well, add shrimp. If you have large shrimp, cut in small pieces.
  • If you have pork belly on hand, mince the fat and add into the pork filling mixture. This makes the pork super juicy! This is optional though because I understand that not everyone has pork belly fat on hand.
  • Then, add water and sesame oil and make sure the pork mixture is mixed well.
  • Next, you want to get your wonton wrappers ready. Most of them come in a square shape so you should cut them in circle. If you can find wonton wrappers that are already in circle shape, then you can skip this step. An easy trick is to cut one wonton wrapper in a good circle and lay it on top of a stack of wonton wrappers to get all of them an even size.
  • To wrap the wonton wrappers, you need a little bit of water in a bowl. Paint the edge of the wonton wrapper with the water. This helps the wrapper stick together.
  • Add 1 tbs (and a little more, depending on size of the wonton wrapper) of the pork filling in the center and scrunch the edges.
  • Place the sui mai on a flat surface and make it stand tall. (reference the video)
  • After wrapping all the sui mai, you can steam them! I steamed around 10 sui mai in med-high heat for 12-15 minutes and they're ready to eat!

Video

@cookwithdana

Anyone missing dim sum (yum cha) during this pandemic 🙋🏻‍♀️ #comfortfood #homecooked #dimsum #chinesefood #dumplings #shrimp #cantonese

♬ Love Scenario – Smyang Piano

Did you make this recipe? Tag @cookwithdanaa on instagram to show me your beautiful creations!

in Appetizer, Main Dishes, Recipes # dim sum, shrimp dumpling, shrimp siu mai

Reader Interactions

you may also like
Kimchi Udon (15 Minutes Meal)
How to Make Salmon Sashimi
Filipino Mango Float
Chinese Porridge (Jook) with Pork and Century Egg

Leave a Reply Cancel reply

Your email address will not be published. Required fields are marked *

Recipe Rating


Primary Sidebar

About Me

Hi there, I'm Dana and I create Asian recipes that are yummy and easy for everyone to make! I hope my food reminds you of a little taste of home.

Sign up to receive the latest asian recipe!

Top hits!

Featured

udon noodles with spicy sauce, green onions, fried egg on top in bright light

Kimchi Udon (15 Minutes Meal)

Latest ‘Grams

Me visiting New York 5 years ago vs. this past sum Me visiting New York 5 years ago vs. this past summer! So much has changed since then. I went to NY when I just graduated college and was introduced to the food scene for the first time ever thanks to my dear friend, Tina (hi girl!). Then, I went back this past summer and fell in love again with the food. I think New York does a modern take of asian food very well (doesn’t compromise the original flavors). Don’t get me wrong, there’s very tasty authentic food for really cheap too! One of my favorites is May Wah Fast Food in Chinatown where they serve delicious Taiwanese chicken rice for $6.50!

Check out my new blog post of the best places to eat in NY (in my opinion of course!!) [https://cookwithdana.com/best-places-to-eat-in-new-york/]

If you’re local to NY/visiting and tried one of the restaurants, send me a photo! I love to see and live vicariously through u.

---

#newyorkfood #bestplacestoeat #restaurants #asianfood #delicious
We stayed in for Valentines Day to enjoy a Thai-In We stayed in for Valentines Day to enjoy a Thai-Inspired Dinner! We ate basil pork belly, braised soy sauce eggs, taro & pork belly (made by my dad!), shrimp toast, pork chops, and mango sticky rice for dessert. I made the dessert with my boyfriend, Theo and it took 10 minutes! We used @eatinnovasian Sticky White Rice mixed with sweetened coconut milk. Then, placed ripe yellow mango on top for a delicious thai-inspired dessert :) Swipe to see our food tasting reaction. #ad

Here’s a quick recipe on how I made the mango sticky rice - 

Ingredients:

- @EatInnovasian Sticky White Rice (half pack)
- 1 cup coconut milk
- ⅓ cup white sugar (adjust to your own sweetness)
- Pinch of salt
- 1 ripe yellow mango, sliced

Directions:

1. Heat up coconut milk with sugar and salt. Stir frequently and cook for 3-5 minutes. Cool down.
2. Heat up sticky white rice according to package directions.
3. Once the rice cools a little bit, add ¼ cup of the coconut mixture and mix together. Plate the rice with sliced yellow mango. Pour leftover sauce (as much as you’d like) on the mango and rice. 

Please note that this is not the same as thai mango sticky rice, but a great hack to get a quick, easy, & delicious thai inspired dessert :) 

—
#InnovAsianOccasion #MakeItAMeal #easyrecipes #asianrecipes #dessert
So EXCITED (and nervous) that our family cookbook, So EXCITED (and nervous) that our family cookbook, Homecooked, is launching today! The book includes 15+ written recipes and video tutorials so you can watch exclusive, delicious, and calming video content all at once🤩! You can shop the cookbook in the link in my bio or go to cookwithdana.com/shop

All the recipes mean a lot to me because they were the foods that my parents made for me as a kid. As I've gotten older, I started appreciating these dishes more because they remind me of home! Most importantly, I wanted to pass down authentic recipes and share the meaning behind some Chinese traditions to my kids and virtual friends (hehe you!) 💜   If you grew up in a Cantonese household and you miss some 'homecooked' food, you have to make these recipes ◡̈  (I got Sai Yeung Choy Tong there for my canto gang!)

I've been cooking with my family this past year in the kitchen to taste test and film how to make their best dishes. We tweaked and MEASURED (IYKYK) all our recipes to ensure that you can have a taste of our home. Some of my favorite recipes in the cookbook are cha siu, crab with vermicelli, and pork & chive potstickers! It would mean the world to us if you cooked these recipes as well. 

Hope you get to cook an authentic Chinese feast or learn more about Chinese culture with Homecooked♥️💛 

If you wondered how the aesthetics are sooo 👌🏼, or you've already seen how BEAUTIFUL they look, all credit to my SUPER TALENTED friends @aiireeyo @lifted.and 

Also thank you for the ones the liked my first post hehe I messed up 🤣 and reposted again. 
---

#chineserecipes #chinesecooking #familyrecipes #deliciousfood #potstickers
I had a dinner party last week and we made miso ca I had a dinner party last week and we made miso carbonara, ginger scallion lobster and an Asian inspired charcuterie board. 

Check out my reels to see the ginger scallion lobster recipe and video. I used fresh lobster and fried the ginger and scallions in @cookwithyouyou tea seed oil! I love using the oil when cooking food in high heat (for that wok hei flavaa 😉)

——
#cookwithyouyou #dinnerideas #thanksgivingdinner #asianrecipes #seafood
BLOG LAUNCH TODAY! check out cookwithdana.com for BLOG LAUNCH TODAY! check out cookwithdana.com for full recipes. 
Hi everyone! For those that are new here, my name is Dana and I create easy Asian recipes that taste like home. I’m super excited to show you what I’ve been working on for the past few months. I know that a lot of you come to my Instagram to check out the recipes but they also will be uploaded on the blog for easy access. I hope you can visit the blog and let me know what you think 💕
Be sure to subscribe to get the latest Asian recipe!
Do you prefer to view the recipe on IG or on the blog? I love to hear your thoughts 🤩
The lemongrass pork is so flavorful; and the radis The lemongrass pork is so flavorful; and the radish, carrots, and herbs make this banh mi the perfect bite. 

The marinade for this pork is not to be missed! You can check out the recipe in my IG reels ♥️

#LeeKumKee and #LeeKumKeeSauces
2021 © Cook With Dana
made by soulmuse